Crust:
- 1/2 stick of butter
- 1 (10 oz) bag of mini marshmallows
- 6 cups of rice krispy cereal
Cheesecake:
- 4 (8oz) packages of softened cream cheese (32 oz total)
- 2 (14oz) cans of condensed milk (28 oz total)
- 1 tablespoon of vanilla extract
- 2 tablespoons of fresh-squeezed lemon juice
- variety of food colouring
- sprinkles to decorate
- 9-inch springform pan
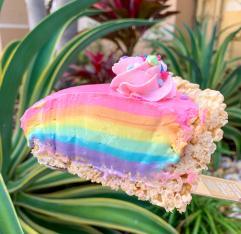
Now, many cheesecake lovers prefer whipped cream as their topping however, we chose to use our homemade buttercream frosting recipe to top ours (mostly for picture purposes) but either way tastes great, so do whichever you prefer!
Directions:
Work On The Crust First:
- Completely melt the 1/2 stick of butter over a large saucepan.
- Add the marshmallows and stir until creamy.
- Add the 6 cups of cereal and stir until fully mixed. Remove from heat.
- Transfer the cereal mixture to the springform pan. To do this, grease the inside of the springform pan generously to prevent sticking. Also, grease your hands slightly to easily transfer the cereal mixture to the pan (we use pam baking spray). Use all of the cereal mixtures to fill the bottom of the pan and up the edges of the pan too. We also used a measuring cup to easily mould the mixture around. Remove any excess mixture at the top of the pan.
- Put the crust into the freezer to set while you prepare the filling.
The Filling:
- In a stand mixer, mix softened cream cheese, condensed milk, vanilla extract and lemon juice until a smooth and creamy texture develops.
- Pour the mixture into multiple bowls/containers (however many colours you want to use, we used 6)
- Add food colouring into each bowl/container…the less food colouring the lighter and the more food colouring the darker/brighter. Again, this is your preference.
- Remove the crust from the freezer and add ONE colour of mixture to the bottom of the crust (in our case we did the rainbow backwards so started with purple). Place it in the freezer for 20-30 minutes to let the purple layer set.
- Then repeat layer by layer allowing each layer to set before adding the next layer otherwise it will all mix together and you won’t have a layered look. Once we did the last layer (pink) we allowed it to set overnight in the refrigerator before decorating.
- Decorate to your desire & ENJOY!
If you want to skip the layered look, you can always opt to just do a mixture of colours by adding the cheesecake mixture spoonful by spoonful on top of the crust.
** also if you want to ensure your filling sets, mix 1 package of gelatin with 1 cup of boiling water and add it into the filling mixture before separating into different bowls**
Source: https://soflofooodie.com

